Each year over 17 billion toilet paper tubes are thrown away, and most end up in landfills.
To put that in perspective, this amount of waste is enough to fill the Empire State Building…twice! And did you know that in New York City alone, 14,000 toilet paper inner tubes are thrown away every 15 minutes?” (source)
[Read: 13 Crazy Facts About Home Paper Products & the Environment]
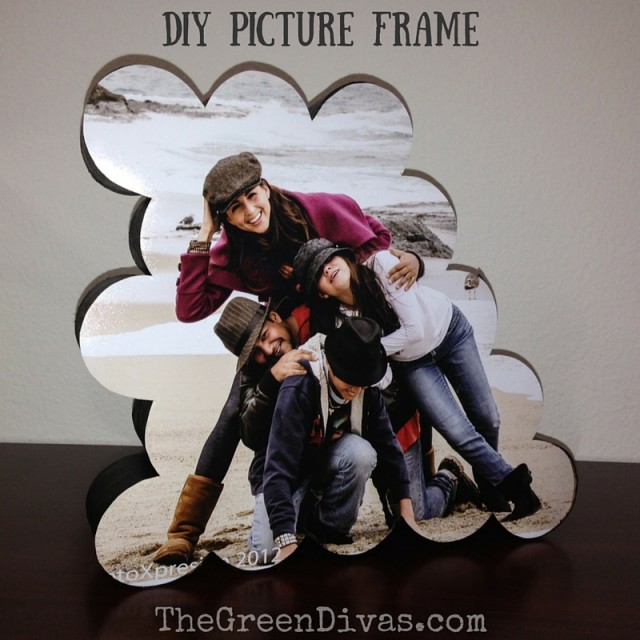
Well, we’ve got a way that you can take that unwanted bathroom trash and turn it into a fun family project that also looks GREAT!
This DIY picture frame was inspired from my necessity to save all those little cardboard tubes, along with paper towel tubes, until one day my closets were overflowing. At that point I decided that I needed to actually do something with these tubes! They were still good… they were durable and I couldn’t just let myself throw them away. After a little bit of playing around, it came to me!
DIY Toilet Paper Roll 3D Picture Frames
Here’s What You’ll Need

- Paper Towel or Toilet Paper Rolls
- Picture (The One That You Would Like Framed)
- Scissors
- Cardboard Cutter
- Paint Brush
- Pencil
- Measuring Tape
- Silicon/Super Glue
- Paint (Optional)
- Mod Podge
Here’s How
1. Measure! First you have to decide how far out from the wall you want your picture to sit. I decided to go with 4cm. Mark the desired depth on your paper rolls with the pencil.

2. Cut Each Piece. Carefully cut each piece with your cutter, making sure that each piece is exactly the same size, and be careful not to crush the rolls as you cut.

3. Make sure you have enough circles. Cut several rolls to accommodate the size of the picture.

4. Layout! Take the picture that you have decided to use, and set the rolls on top of the front of the picture in order to better organize them. Make sure that your rolls cover the entire space of the picture that you want to feature, and make sure they do not overlap or hang over the edge outside of the picture area. You can be very creative with this, organize the rolls in any shape or design you want, just making sure your picture is big enough to fit over the top of your design.

5. Glue. Glue the rolls together in your decided shape using either hot glue or silicon.

6. Draw the outline. Once the glue has dried, put the rolls over the top of the front of your picture once again and draw and outline on your picture using the outside of the rolls as marking. Then cut the picture out and it should be exactly the same size and shape as your glued together rolls.

7. Paint picture with Mod Podge. Once your picture is cut out, spread Mod Podge across the back of the picture and that will make it stick to the cardboard design. You can also use silicon or hot glue to do this, just be careful not to put it on too thick or leave bumps, because that will leave bumps in your picture.

8. Paint the Cardboard. When everything is all glued together, paint the outsides of the cardboard to whatever color you would like. Get Creative! NOTE: You may also want to consider painting the entire frame and front of the picture with a thin layer of Mod Podge in order to give it a little bit more protection.

9. OPTIONAL: Glue the Same Picture to the Back. For the back, you can either leave it as it is, glue another piece of cardboard to it that is the same shape as your design or use the same photo repeating the process on the other side so your picture frame is double sided.
And presto!!!! That’s how you can make a handmade picture frame using stuff you probably already have in your house!! Now all you need to do is set it on your desk/table or hang it upon the wall! This project is kid friendly, fun, creative and environmentally conscious. Also, with the holidays coming up, it makes a great gift for anyone on your shopping list, and honestly, who doesn’t have toilet paper rolls rolling around somewhere?
Bonus:
Listen to the latest Green Divas DIY radio show segment…
Catch the latest Green Divas Radio Show—and other green, healthy and free radio shows—daily on GDGDRadio.com (or get the GDGD Radio app)!
[dynamic-sidebar id=’Custom Widget 2′]